
In my second-to-last blog post I covered how to build your own mechanical keyboard.
In this post I’ll describe the process of building my mechanical keyboard, which I called Appa.

Motivation
I needed a keyboard and my friends recommended buying a mechanical one.
During the conversation, they told me there are keyboards where you can modify the firmware — and that was enough to convince me to buy one of those.
After some research on the internet (more specifically on Reddit) I found some open source and open hardware keyboard projects. One of them was the Plaid. Looking at the project I realized it wasn’t complicated to reproduce, and not only that — I already had practically all the components, like the diodes and the ATMEGA328 microcontroller. I was just missing the main characters for building a mechanical keyboard: the switches.
While working on a toll plaza project for my company, I noticed that the keyboards on the toll collection terminals were mechanical keyboards. However, the switches didn’t look like the famous Cherry MX — they were a bit different.
After a lot of searching, I found the image below, and through it I discovered that the switches on those toll collection keyboards are called ALPS.
I could tell these were great switches, but very hard to find nowadays. So I searched Mercado Livre for keyboards from Gertec (the brand of the toll collection keyboards) and found a 66-key keyboard for only R$66. I decided to buy it and design a PCB to use these switches.

Choosing the project name
I chose this name as a tribute to Appa, a character from the animated series Avatar: The Last Airbender. Appa and Momo (another character from the series) are my favorite animals from the entire show.

Since I had already decided to use ALPS switches in the project, I chose the name Appa because it starts with the letter “A”. And I’ll name a future keyboard project with Cherry MX switches Momo — see teclado-momo.
Case Design
Before developing the Printed Circuit Board (PCB), I started researching cheap cases for the keyboard, but the cases I found didn’t support ALPS switches. After a lot of searching online I found the site 40percent.club.
On this site I found a version of the Gherkin keyboard with a wooden case..
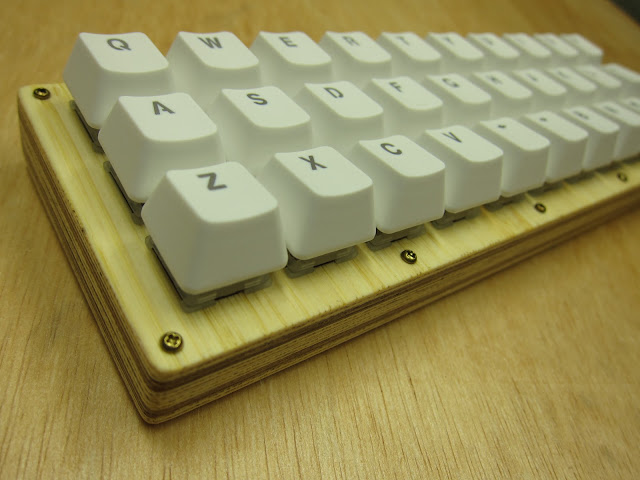
This keyboard gave me the idea of making my case out of acrylic, with laser-cut pieces. These pieces would be stacked on top of each other, forming a “sandwich” of acrylic layers, held together by exposed screws. I just needed to design these pieces so I could order the cuts. After some research online I discovered the tool swillkb, whose purpose is exactly to make it easier to create keyboard cases.
To use the swillkb tool, I needed a keyboard layout. So I used the keyboard-layout-editor.com tool to create a QWERTY layout with 48 keys. I exported this layout as JSON and used it in swillkb along with the other settings I’ll list below:
- Layout
[{a:7},"ESC","Q","W","E","R","T","Y","U","I","O","P","BKP"],
["Tab","A","S","D","F","G","H","J","K","L",";","´"],
["Shift","Z","X","C","V","B","N","M","<",">","/","RET"],
["CTRL","ALT","MOD","LAY","SPC","MOD","MOD","SPC","LEFT","DOWN","UP","RIGHT"]- Switch Type:
ALPS - Stabilizer Type:
Alps (Costar fallback) - Case Type:
Sandwich - USB Cutout:
- Location:
0 - Width:
15
- Location:
- Mount Holes:
10- Diameter(mm):
3.5 - Edge Width(mm):
10
- Diameter(mm):
- Edge Padding:
On- Top(mm):
10 - Right(mm):
10 - Bottom(mm):
10 - Left(mm):
10
- Top(mm):
- Plate Corners:
5 - Kerf:
0.15
After entering all this information into the platform, I exported all the case files, and they can all be accessed in the appa-case repository. Then I ordered the cuts in MDF and transparent acrylic from a company near my house.
The result was this:
| MDF | Acrylic |
|---|---|
 |  |
The next step is developing the PCB.
PCB Development
I used the Plaid project as the base for my project and used KiCAD 6.0 to draw the schematic diagram and the PCB.
For the PCB design I decided to use only components I had at home, to keep costs down. The chosen components were:
| Component | Quantity | Image |
|---|---|---|
| 1N4148 Diode | 48 | |
| 3.3V Zener Diode | 2 | |
| PTH Resistors 1/4 W | 4 | |
| PTH Tantalum Capacitors | 3 | |
| PTH Ceramic Capacitors | 3 | |
| Arduino PRO Mini* | 1 | |
| ATMEGA 328* | 1 | |
| PTH 16MHz Crystal | 1 | |
| USB Type B female* | 1 |
The Arduino PRO Mini was chosen because I already had several of them at home, and this development board uses the ATMEGA328 as its microcontroller.
I also added the standalone ATMEGA328 circuit to the board, since I also have several of these microcontrollers at home.
The choice of the USB Type B connector was also because I had several of them at home — and I bitterly regret that decision, but more on that shortly.
Finally, here’s the schematic:

After finishing the PCB design, I exported the gerber files and ordered 5 boards from JLCPCB, which cost only R56.05 for the production of the 5 boards and R$58.72 for shipping. Yes, shipping cost more than manufacturing the boards.
Removing the switches
To assemble the PCBs, I first needed to remove the switches from the Gertec automation keyboard.

Unfortunately I don’t have photos of the switch removal process from the plate and PCB of this specific keyboard (the 66-key one), so I’ll show the process I did right after with the 44-key keyboard.
It was a relatively simple process — I used a soldering iron, solder, and a solder pump to remove the solder from the switches. After that I used tweezers to release the switch clips from the plate and a screwdriver to push the switch out.
After this process, I lubricated the switches.
Lubricating the switches
To lubricate the switches I watched some videos by Chyrosran22 on YouTube, more specifically the video Alps restoration guide part 4: how to lube Alps switches. Then I visited Mercado Livre and bought a mechanical keyboard lubricant called “Graxa Branca de Silicone” (White Silicone Grease). I also bought some ultra-fine makeup brushes, because they were MUCH cheaper than the brushes suggested for keyboard hobbyists (and they do an excellent job, by the way).
Then I repeated the process described in the video for all 66 switches in the set.
PCB Assembly
After receiving the PCBs, I started the keyboard assembly process.
The PCB production quality from JLCPCB impressed me. The board looked beautiful in black.
Since the assembly process has several steps, I created the video below on my phone, which summarizes the entire keyboard assembly process:
Appa Keyboard
If you can’t watch the video through the link above, try this link.
Bootloader and Firmware
Since the ATMEGA328 microcontroller doesn’t have a built-in USB interface peripheral, we need to use USBaspLoader, a bootloader for AVR microcontrollers.
With USBaspLoader, we can use the ATMEGA328 microcontroller as an HID device, and we can also use it to flash the firmware onto itself. Usually we’d need an external programmer for this, like the USBAsp. But with USBaspLoader that’s no longer necessary.
So I tried to compile the hsgw/USBaspLoader project, but without success. After some research I found a post online called How to burn the Plaid keyboard bootloader using Arduino Nano. The author gives tips on how to flash the bootloader, but also posts the link to the .hex file, which conveniently is in the hsgw repository (a file I had completely overlooked).
So I flashed the bootloader onto my Arduino Pro Mini using a USBAsp and apparently everything was working (or so I thought).
Testing
Right after flashing the bootloader I started testing to check if the keyboard was working. I plugged the keyboard into my computer and it didn’t work, so I ran the dmesg -w command and got the following log:
[   80.326497] usb 1-3: Product: Plaid
[   80.326503] usb 1-3: Manufacturer: Dm9Records
[   80.359555] input: Dm9Records Plaid as /devices/pci0000:00/0000:00:14.0/usb1/1-3/1-3:1.0/0003:16C0:27DB.0006/input/input29
[   80.418493] hid-generic 0003:16C0:27DB.0006: input,hidraw0: USB HID v1.01 Keyboard [Dm9Records Plaid] on usb-0000:00:14.0-3/input0
[   80.421175] usbhid 1-3:1.1: can't add hid device: -71
[   80.421181] usbhid: probe of 1-3:1.1 failed with error -71
[   81.738940] usb 1-3: reset low-speed USB device number 8 using xhci_hcd
[   83.450544] usb 1-3: reset low-speed USB device number 8 using xhci_hcd
[   85.174040] usb 1-3: reset low-speed USB device number 8 using xhci_hcd
[   86.893789] usb 1-3: reset low-speed USB device number 8 using xhci_hcd
[   88.665499] usb 1-3: reset low-speed USB device number 8 using xhci_hcd
[   90.397112] usb 1-3: reset low-speed USB device number 8 using xhci_hcd
I searched for this error online, but had no success. I visited the [QMK Discord server], and someone there mentioned checking if the problem could be with the zener diodes.
Since I built the keyboard with components I already had on hand to keep costs down, I used 3.6V 1W zener diodes. After swapping the 1W zener diode for a 0.5W zener diode, the keyboard started working perfectly.
RGB
Since the keyboard case is made of translucent acrylic, I decided to install a WS2812B LED strip on the underside of the PCB to give a glow to the bottom layer of the keyboard — the so-called underglow. So I bought 1 meter of WS2812B LED strip, which has 30 LEDs.
To activate the LEDs, I used one of the two I2C terminals of the ATMEGA328 that I had left exposed on the PCB in case I wanted to add a display or even another microcontroller to the build in the future.
Then I got to work:
Firmware
The keyboard firmware is developed using qmk and the code can be found in the appa-firmware repository.
Final thoughts
Building my first keyboard was definitely a delightful adventure. I got to do what I love most — create electronic devices. Now I have a keyboard I can call my own, because I designed it myself.
I’d like to thank Takuya Urakawa for creating the plaid project, which I used as inspiration.
The Appa project is still a work in progress and will likely undergo changes in the future. The first one will be replacing the USB B connector with a USB C connector, because thanks to the USB B the keyboard became absurdly tall (about 3cm). I’ll also replace the ALPS switches with Cherry MX, since unfortunately ALPS switches are very hard to find for purchase and practically impossible to find keycaps for.
As a reminder, the project repositories are:
Finally, here’s a video summarizing the assembly of the Appa:
See also
- teclado-momo — the Cherry MX keyboard, Appa’s successor
- glossary — terms like QMK, ALPS, Cherry MX, USBaspLoader, WS2812B